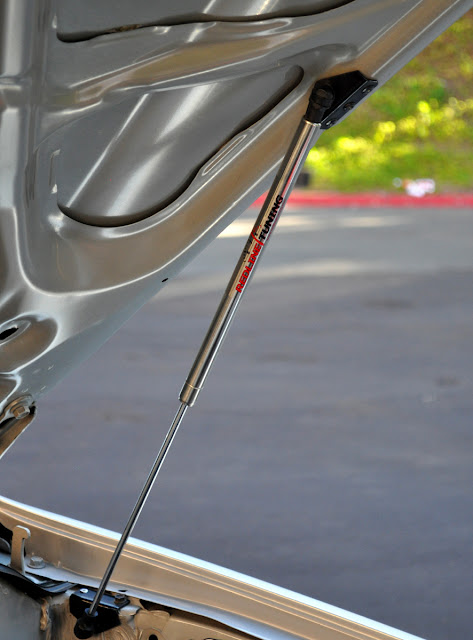
Redline hood struts make it nice to perform modifications as the original hood prop has been removed.... a hood prop makes a fine child beater, but suck as decent hood openers
Grille-craft insert looks much better than the OEM. Easily modified with a hack saw and a drill to install.
Icon extended length coil-overs and Total Chaos Upper Control Arms (UCA)
nothing in the shot above is all that out of the ordinary.
Off Road Warehouse brand limiting straps which are 9". Welded to the frame is a 2" billet steel bung and I slid the stainless clevis through it. Purchased from Toyota are new splash guards to give it the factory look.
Here we see an above shot of the ARB twin compressor (left in blue), remote solenoid tank for the ARB locker (on the firewall upper left, looks like a silver thermos with black end caps) and air tank hose (blue line with orange fitting) routing. Also, the custom non OEM air intake tubing and re-built throttle body. Intake tubing was bought at Napa Auto parts (its the stuff that looks like a slinky)
My original Throttle body was gummed up and needed a re-build. I ordered one from Pick-A Part to keep the truck running while the original (above in the photo) was getting the full treatment ... these throttle bodies are so in demand, LC Engineering never has any onhand to use as a donor core.... they cost $1100 at the dealership for a new one.
I sent the original unit to LC Engineering. They over-bore it 4mm and cleaned out all of the vacuum ports, rebuilt the shaft seals and installed a larger butterfly.
Here we see the results of what LC Engineering does to their 'Big Bore' throttle body kit. It does wonders for this underpowered beast. Lots more stamina instead of constant use of the Overdrive "off" button to get into a lower gear for freeway hills.
Simple to install and far cheaper than going with a re-built unit from any junk yard and definitely cheaper than the dealer. Paid $225.00 for the rebuild and added the other parts to it which resulted in 2 more MPG and improved performance. The junkyard throttle body is now held onto for use as a spare... for me or anyone that has a problem on the trail
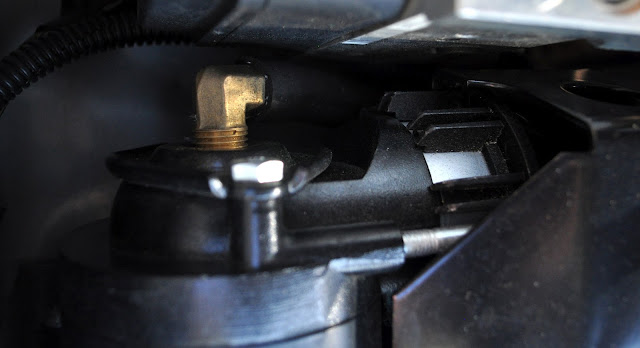
Solenoid on the front of the cylinder(square thing) in the above photo is for actuating the ARB locker. The right angle fitting to the right of the solenoid was shipped from Poland for $27.00.
It feeds the driver side slider which is the actual air tank.
That fitting is specific because the cylinder is tapped with British Standard Pipe Thread (Metric) which has a different thread pitch than what we get in the USA. The pitch is 45 degrees versus 55 degrees. PITA to figure out when you're just a car guy. Who knew.
You don't need a right angle for most applications in trucks, but I did a unique thing, that gets expensive.
ARB is from Australia so be prepared to order some hard to find parts. Get most of your parts from www.Marlincrawler.com in the Fresno area of Califinia. Good guys to work with and very knowledgeable too.
In the above photos the brass right angle fitting is connnected to the air intake for the twin compressor, I changed its connection from the factory filter that is connected to a short line, just filtering air near the compressor... getting the filter dusty, dirty, and hot air (hot air into a compressor = you buying a new compressor when it gives out. Compression creates heat, so you need the coldest air possible for the intake side of the compressor, so now I plumbed it to pull outside air from the filtered side of the factory air box... past the filter, on the throttle body side... not hot air from around the engine exhaust manifold/headers
120 amp alternator from Napa... a 80 amp was stock, but it was replaced cause it can't run a compressor and the truck at the same time... the compressor is 56 amps.. you have to upgrade the alternator. I tried a cadillac alt... but all 3 I tried failed at the shaft bearing. Cadillac? Crapilac
Odyssey battery is awesome.
Behind the above badge is the "Airbag" pressure molded words... not interesting. Out of site... now it's a 20 dollar bitchin' looking tag of TRD.
Alpine CD/DVD/Nav system performs flawlessly. Nothing better when out on a trail, maybe a fun type of "lost... I don't care where I am, it was fun getting here", then reverse yourself out by hitting a button to use GPS to go back on your trail heading out to population.
Custom switches are in a factory location. The CB cable on the far left side is inserted to a special socket, which I hard wired to the far right switch (labeled) side for on off. The socket is the foremost part of the CB module, the cable has a special quick disconnect that I had put on instead of the CB factory fitting that twists in like a BNC connector, quick connects, and quick disconnects, are pleasant, not time consuming when you are on the trail. Notice the silver tab on the top of the CB cable...
The slider switch operates the solenoid to allow the air compressor to fill the driver side slider... for airing the tires or air tools
Here you see the alternator gauge and mechanical oil psi gauge on the A pillar.
Note the factory rear diff switch which has been cross connected with the ARB compressor switch, it operates the locker after you turn on the compressor first... then the locker
The home-made slider on the driver side is capable of holding 6.5 cubic feet of air.
Here again, this step is removeable for off roading.
It was installed because my GF drives it to work daily and has a hard time getting in without exposing too much leg. So, when she insisted that someone could get an up skirt shot of her getting into this 'Monster Truck' after work, that resulted in my installing this step.
above is is a photo of the bottom of a 2012 Peterbuilt fan clutch solenoid (silver round thing) which is fed from the ARB remote tank under the hood, in previous photos. The switch in the cab controls whether is it on/off. Reason being, should there be contact with rocks or is punctured, it can be electrically shut off , allowing the air locker to be retainied for use.
As noted on most forums, the OEM brakes for Tacomas are crap, there is one size/type for all models for this generation. Fine for city driving maybe, not when you are coming down a 60 degree slope and you would rather control the speed of your descent.
Here you can see the 1/2" wheel spacer behind the rim which required the installation of 2007 Toyota Matrix rear wheel studs. These are for clearance when running the 33" tires.
The 'pinchweld mod' was not necessary as so many people mention hacking and cutting around the front tires to prevent rubbing when using 33 in tires....
Using the spacer, longer studs, and a stock wheel is better than hacking /cutting /welding
Full steering movement is attainable without any kind of cutting. There is a 1/2" piece of steel welded to the rear of the lower control arm where the lower balljoint makes contact, this small change to the distance of steering angle barely affects the amount of turning radius, but eliminates frame rubbing by the front tires at full lock turns.
As all Tacoma owners know, these things turn on a dime and I don't miss a degree of more steering angle. And, running a tire this size eliminates stress on the weak steering rack.
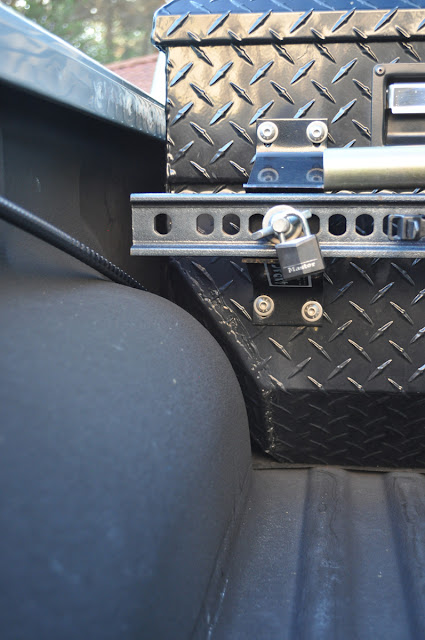
Here is a standard Hi-Lift Jack, nothing special. The Tradesman toollbox, that is a story.
It took a year to get this specific tool box by tradesman because they said it was specific to this step side Tacoma, it isn't. The salesman who was asked at SEMA was wrong, or misinformed by his company brochure... ! And you can see the wheelwell intrudes on the tool box space, so I cut and welded to make it all fit.
Do your research before you buy any tool box. Check the size specs and verify before buying a tool box that it will fit between the wheel wells, and the truck bed rails
To the left of the jhack, above the wheel well, you see the CB antenna.
This is a home-made antenna holder. Total cost was $8.00 A piece of aluminum, a Stainless steel spring, teflon nut and washers, good to go. The hook is nothing special, just a J hook. Marshalls hardware in Miramar http://justacarguy.blogspot.com/2009/03/marshalls-tool-and-hardware-store-i.html
Inside the fuel door is the air fitting which is fed from the rear end of the slider on the driver side. It allows me to run air tools and air up after a run.
Hand made the rear bumper because no one makes an after market bumper for a step side. This was necessary because the OEM bumper was damaged coming off Pancake Rock (in the Eastern part of San Diego county).
Note that the step-side Tacoma fenders have the step (far left of the photo) at a level higher than the tail gate bottom. whereas the fleet side version is flat across the entire width of the truck.
If you make a bumper, you can use it to store air, parts, or whatever you want to design it to do, hold your jack, store bottles of stuff, emergency kits, flares, rope, or chains... whatever you might want extra storage space for
Here between the bumper and tailgate, you see the connection for operating electrical tools. From this point, you can plug in jumper cable or welding electrodes.
Here is the bottom of the uncovered plug.
Jumper cables with a quick connect. Why waste time driving to their truck front bumper to front bumper, the trail might not be wide enough to maneuver, just back up to the person you are helping. Connect to the special quick connect under the truck and then to their battery. Done deal
Here is a shot of the hitch receiver, a hitch with 'D' rings slides in, with a quick diosconnect pin
.
Deaver 8-pack leaf springs... broke the factory ones having a fun time on the whoops at the Sand Dam at Superstition Mountain http://justacarguy.blogspot.com/2011/01/sand-dam-and-superstition-mountain-120.html


1 comments:
Where did you get the three additional spare tire rims?
Post a Comment